MicroSIP Softphone
Overview
In this guide, we will register a SIP endpoint to our MicroSIP Softphone. MicroSIP is an open-source, lightweight SIP client that works perfectly with SignalWire SIP endpoints.
What Do I Need?
-
SignalWire account (guide here)
-
Purchased or Verified phone-number in your SignalWire Space. Read our guide to Buying a Phone Number for more information.
-
Softphone client of your choosing. For this guide, we will use MicroSIP.
SignalWire Setup
To get started making calls, we will need to purchase a phone number and create a SignalWire SIP endpoint.
Purchase a Number
-
First, we will need to purchase a phone number with SignalWire.
This can be done by navigating to your SignalWire Dashboard, and clicking thePhone Numberstab on the left-hand nav-bar. -
Select
Get a Phone Number, or the+Newbutton. -
Use SignalWire's filtering features to select a number that suits your needs, and click the
Buybutton. -
Optionally, set a
Friendly Namefor the purchased number. This will make it easier to keep track of your numbers as you add more to your Space.
For more information on purchasing a phone number, check out our detailed guide to Buying a Phone Number.
Create a SIP endpoint
Now that we have our Phone Number, we can create our SIP endpoint. This endpoint will allow us to connect to a Softphone, and make outbound calls using our newly acquired number.
-
Navigate to your SignalWire Dashboard, and select
SIPfrom the left-hand nav-bar. -
Click the
Create a New Endpointbutton. -
Select a Username and Password for your endpoint. These credentials are how you will connect your SIP endpoint to your Softphone.
-
Select the desired phone number you would like to set as your Caller ID. This can be any purchased or verified number in your SignalWire Space.
-
Optionally, configure your codec and encryption settings. If you are not sure, it is suggested to leave them as their default settings.
For more information on creating a SIP endpoint, check out our detailed guide to setting up a SIP endpoint.
Connect SIP endpoint to SignalWire Phone Number
In the last step, we configured our SIP endpoint to call out using our Caller ID, but if a customer tried to call this number back, it would not reach the SIP endpoint.
To ensure returned calls reach our SIP endpoint:
-
Navigate to your SignalWire Dashboard, and select
Phone Numbersfrom the left-hand nav-bar. -
Select the Phone Number used, and click the
Editbutton. -
In the
Accept Incoming Calls Asdrop-down menu, ensure it is set to `Voice Calls. -
In the
Handle Calls Usingdrop-down menu, selectSIP Endpoint. -
Use the drop-down/search feature to find the enpoint you created earlier. This will be the
Usernameyou set for your endpoint. -
Finally, select the
Savebutton to save your changes.
MicroSIP Setup
Download and Install
- Navigate to here and install MicroSIP or MicroSIP Lite depending on the features you need. If you just plan on using this for Voice calls, either client will work!
Register Your Endpoint
-
Launch the MicroSIP client
-
Select
Add Accountfrom the top-right drop-down menu -
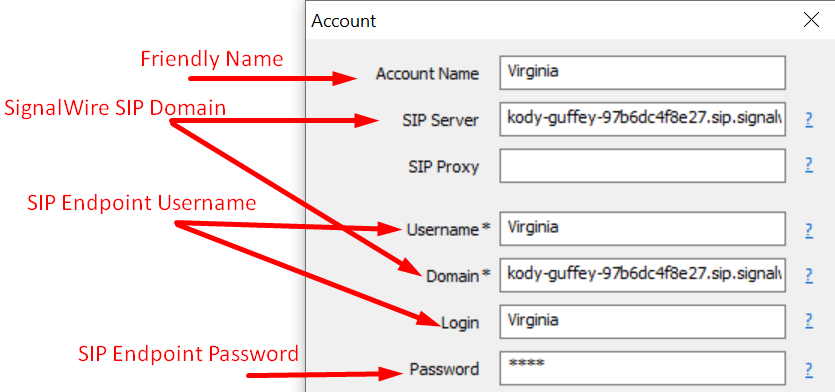
Account Nameis similar to theFriendly Namefor our phone number, and is only to help keep track of several endpoints. -
SIP Serverand domain should be set to your SignalWire SIP domain.
Where is my SignalWire SIP Domain?

-
Usernameshould be the username of your SIP endpoint. -
Domainshould be the same as yourSIP Server -
LoginandPasswordwill be your endpointUsernameandPassword
Visual Reference
Security-Minded?
- Optionally, configure your encryption settings. If your endpoint requires encryption, set
Media EncryptiontoMandatory SRTP, andTransportto TLS.
With this set, you can return to your SignalWire Dashboard, and set Encryption to Required.

You should now be able to handle inbound and outbound calling from your SIP endpoint using MicroSIP.
Try it Yourself
If you would like to test this example out, create a SignalWire account and Space.
Please feel free to reach out to us on our Community Discord or create a Support ticket if you need guidance!